
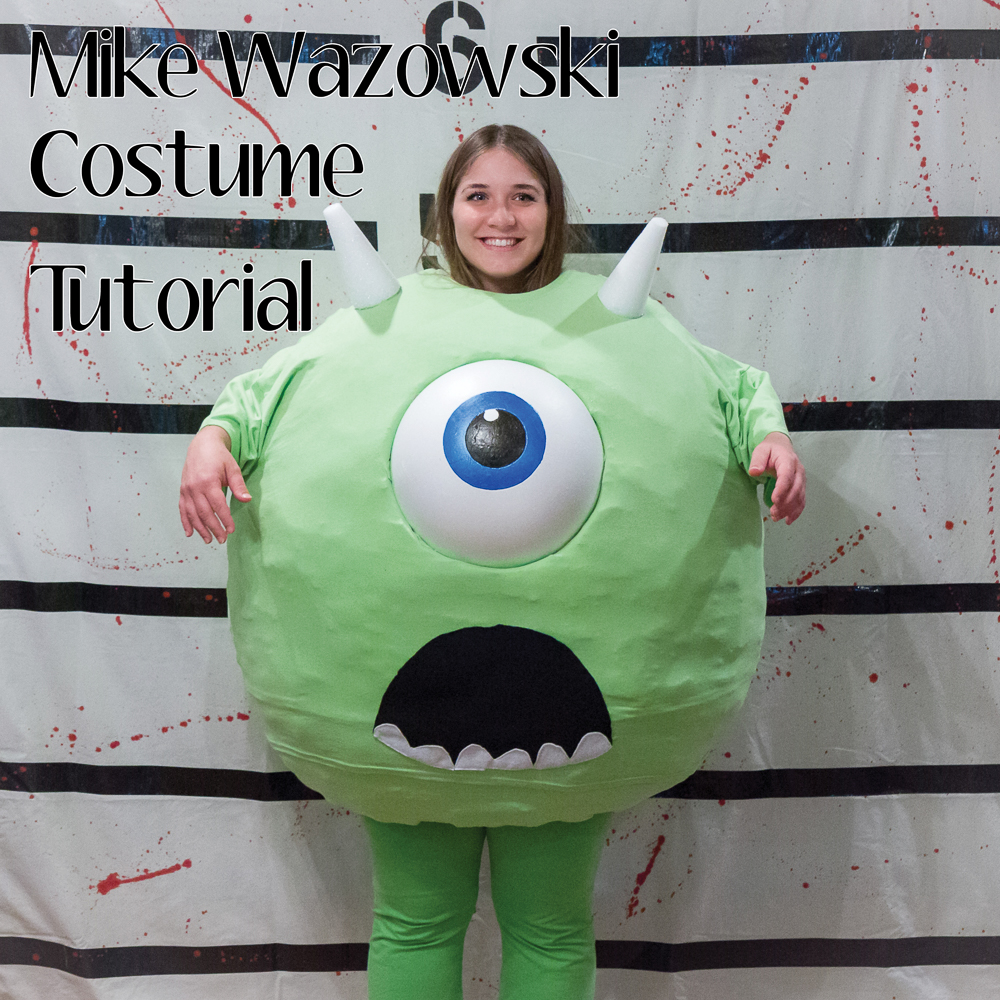
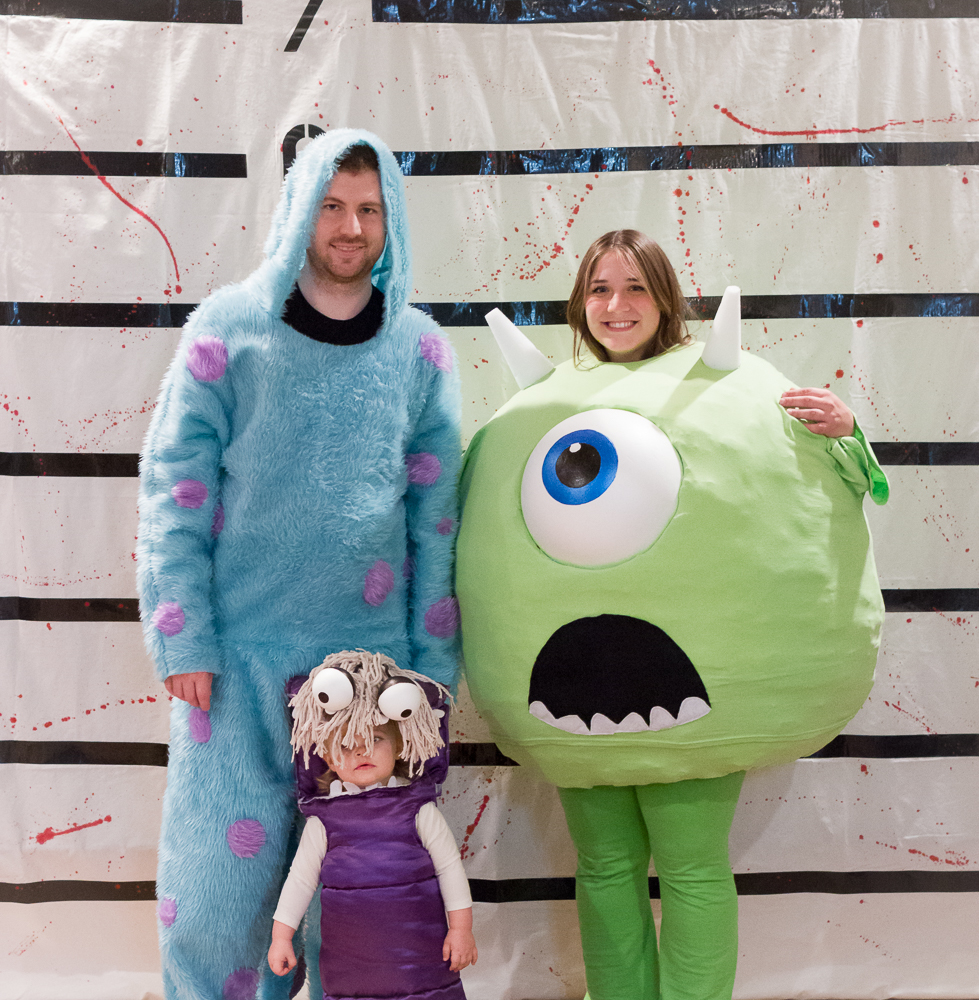
I’ve wanted to dress up as Mike Wazowski, Sully, and Boo from Monsters Inc. for Halloween ever since Emery was nicknamed “Monster” and this year was finally the year to do it! We decided to wait until she could walk so that she’d be able to toddle around in her Boo costume, making it extra cute. I knew these costumes would be a lot of work so I got started early! I tried to remember to take photos of the process so I could do a tutorial post, since I always find them so helpful when I’m making our costumes each year. Of course I never remembered to get out my actual camera, so all these pictures are taken with my iphone, but I think they’ll do! First up is my Mike Wazowski Costume!
Materials:
- Giant yoga ball or inflatable beach ball
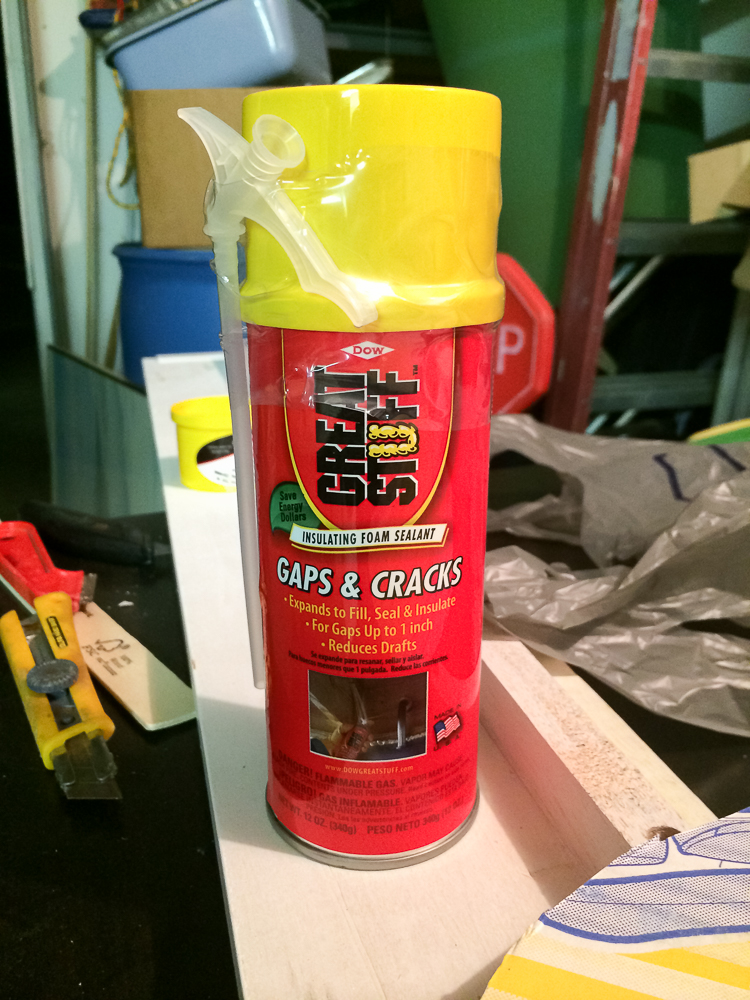
- Great Stuff insulation foam
- Green tshirt(s), size 6XL
- Foam half-ball
- Foam cones, 2
- Paint (blue & black)
- Felt (blue, black, & white)
- Green pants
- Green tshirt (to wear underneath)
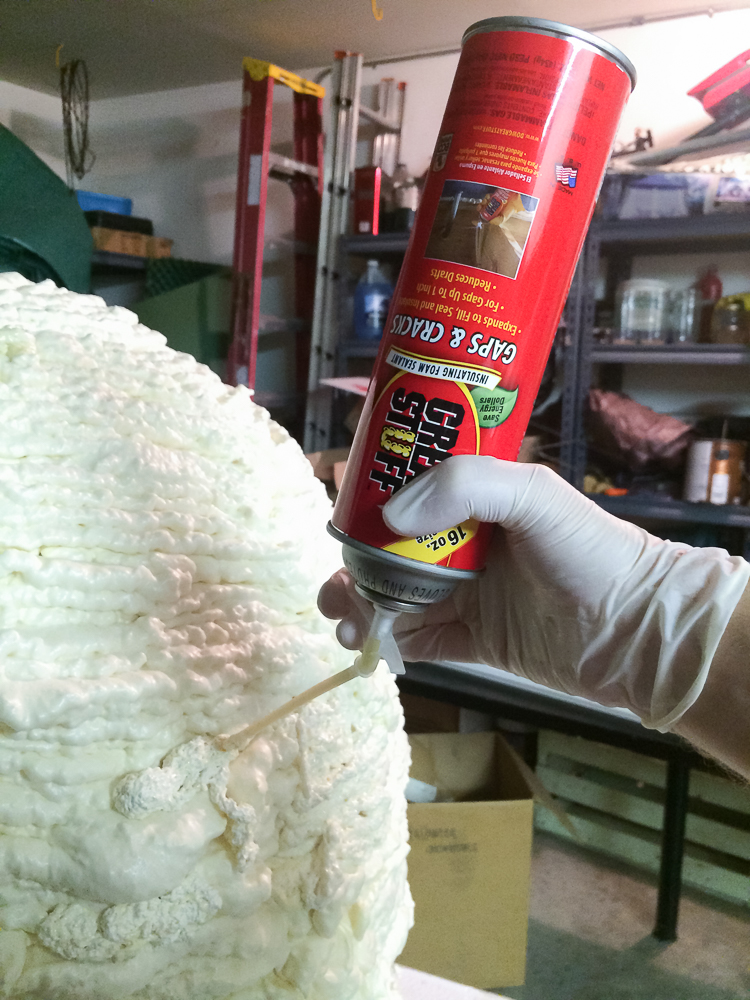
1. I did a lot of research trying to come up with the best way to create a circular costume. I knew I could always paper mache, but we did that last year for our Lucy and Charlie Brown heads and it took forever, so I was not excited about the idea of doing it again on an even larger scale. I had one friend suggest I sew a beanbag cover and then attach it to a tshirt and stuff it. I thought this was brilliant but when I started looking into it found out it was going to be a pretty expensive option because of the price of fabric, plus it would end up looking pretty lumpy. I then found another option: spray foam insulation! Who knew! I read and watched a lot of videos of people using Great Stuff to make props and cosplay gear and I thought it looked like a good solution. It was definitely faster than paper macheing, although more pricey. I decided the extra cost was worth it though because I really didn’t want to take the time to paper mache a giant yoga ball. So Grant and I went to Lowe’s and picked up about 5-6 cans of Great Stuff (found here), I ordered a giant inflatable beach ball off Amazon (this one), and then we got to work!
2. We did all the foaming outside in our garage and for our very sophisticated set up we simply laid a big sheet of plastic down, set up two saw horses on top and laid a giant piece of cardboard across them with a hole cut out so the ball would fit securely on top without rolling around. We then put on gloves, uncapped the can of Great Stuff, and started foaming! We worked from the bottom up, so the foam would build on itself, making it more likely to stick and not fall off. We had to go slowly and it was important to spray the foam as evenly as possible. If we sprayed too much at once, the foam would get heavy and fall. Grant did most of the spraying and then I went behind him smoothing out the foam and helping it to stick to the ball. This is why it’s important to use gloves! You don’t want this stuff sticking to your skin!
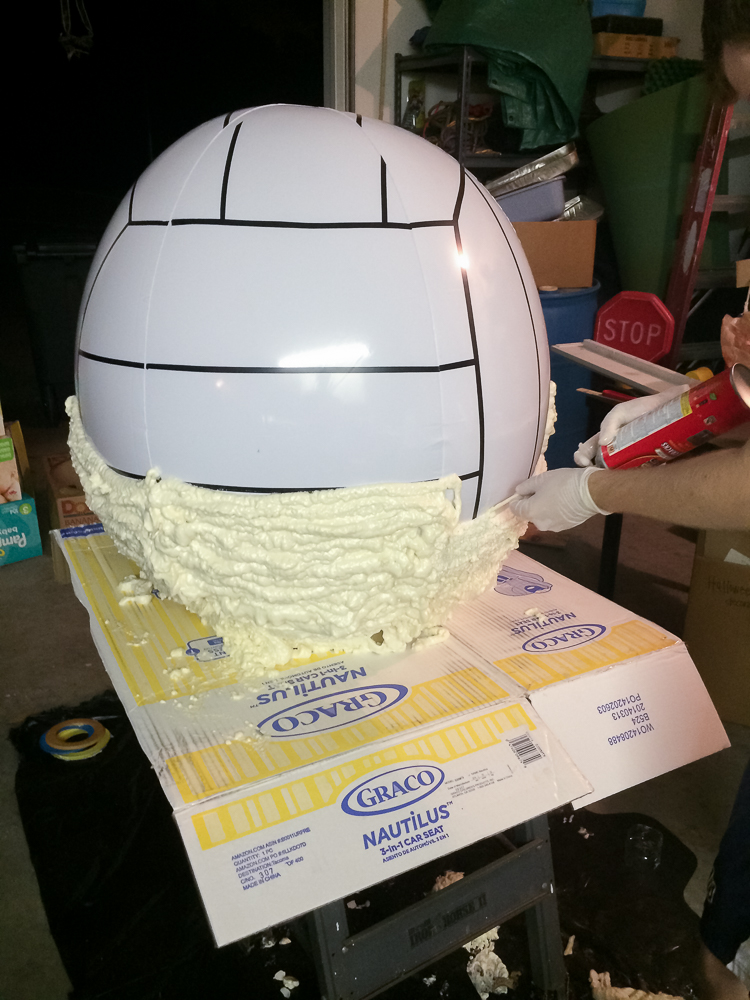
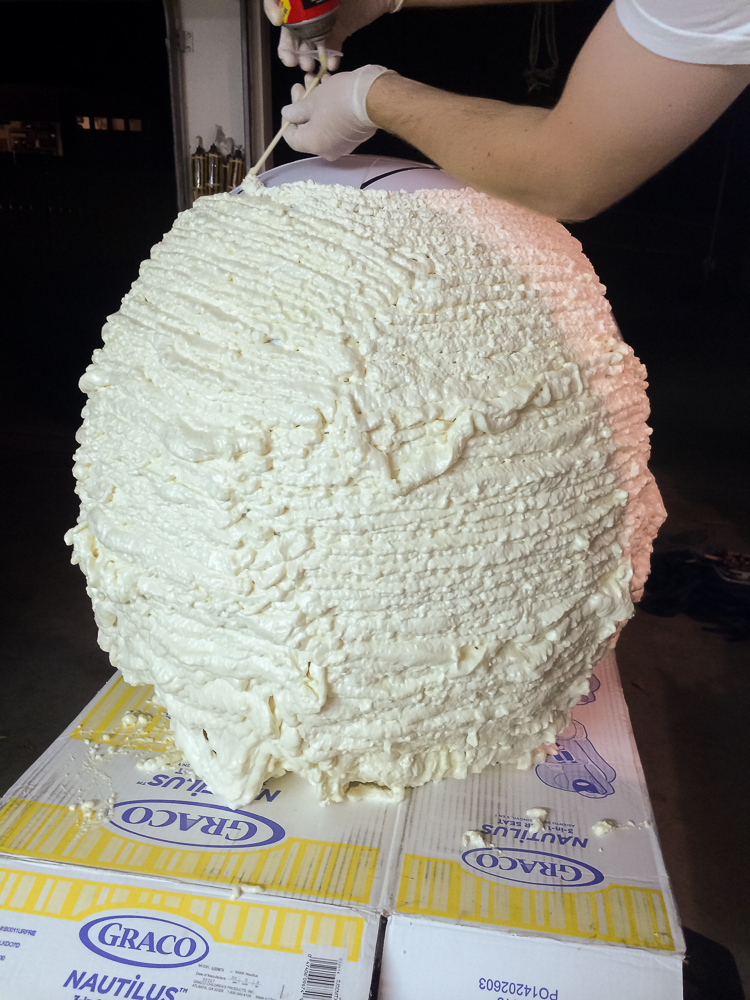
3. Once we got the hang of it, it was actually pretty simple. And really cool to watch! The foam expands to 4 times its original size, which helps cover more surface area. So after we had covered the ball we let it dry over night. I also read online that misting it with water helps it to cure, so I did that before we called it a night. When we came back the next day, it had hardened and looked great!
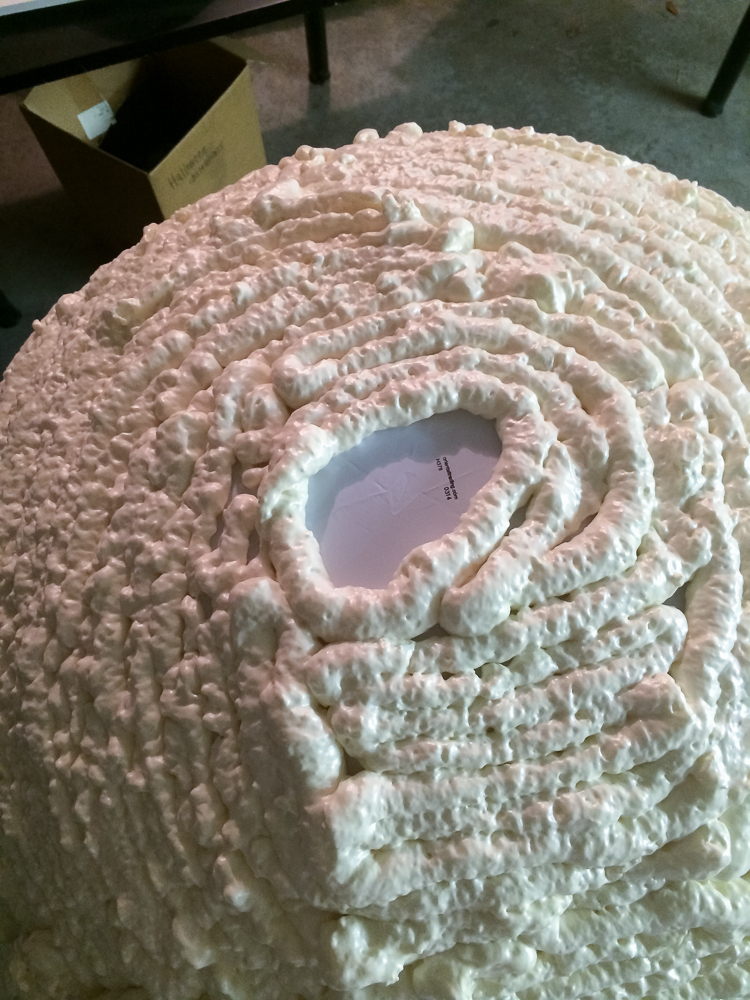
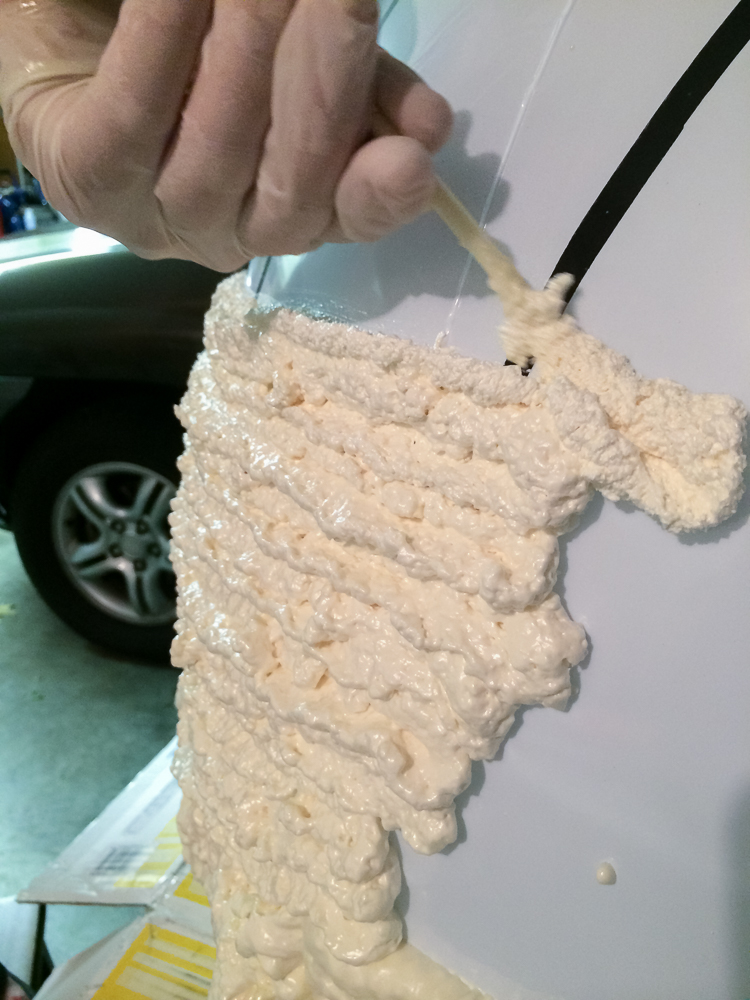
4. We noticed a few spots that weren’t as well covered as other areas, so we went back over those gaps and filled them in with a little more foam. Afterwards, I again misted the areas with water and we let it dry.
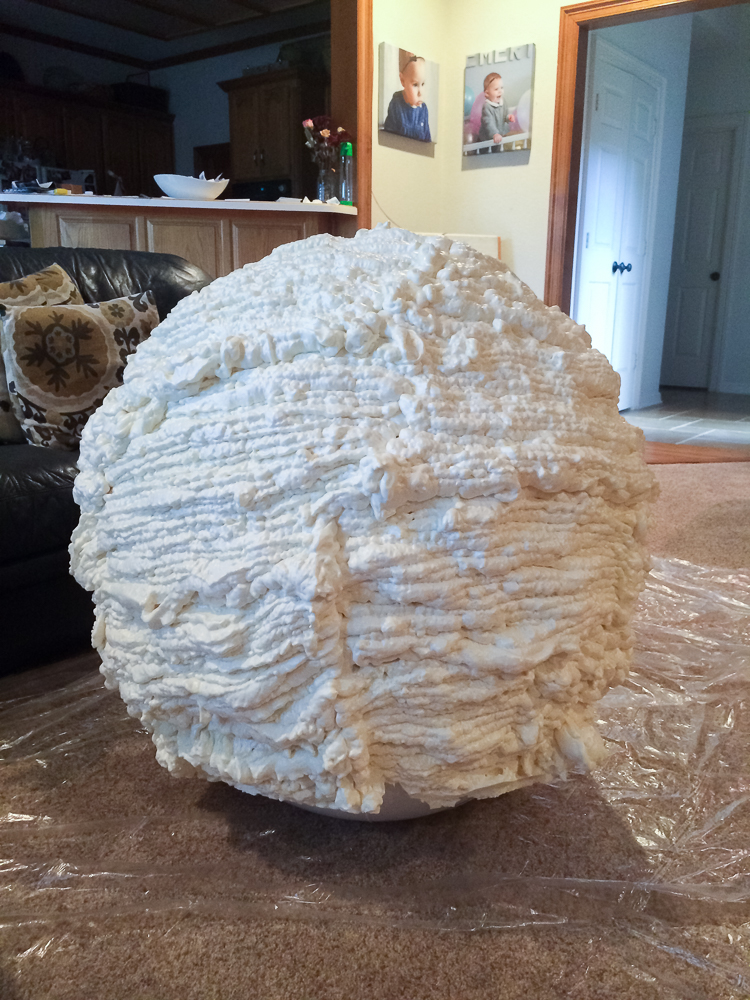
5. The next step was to carve and sand! This is an optional step really, it just depends how smooth you want the final result to be. The foam definitely dries very lumpy and bumpy, but if you don’t mind that, then you can slip this step completely. I wanted my costume to be as round and smooth as possible though, so we took it inside and used an exacto knife to cut off the areas that were protruding out. (You can see what I mean in the picture below: some areas were put on thicker so they expanded more. We used a knife to trim these down.) After carving it, we took it back outside and used our sander to try to smooth it out. This worked fairly well, but it wasn’t perfect by any means. I definitely think it helped in the end though!
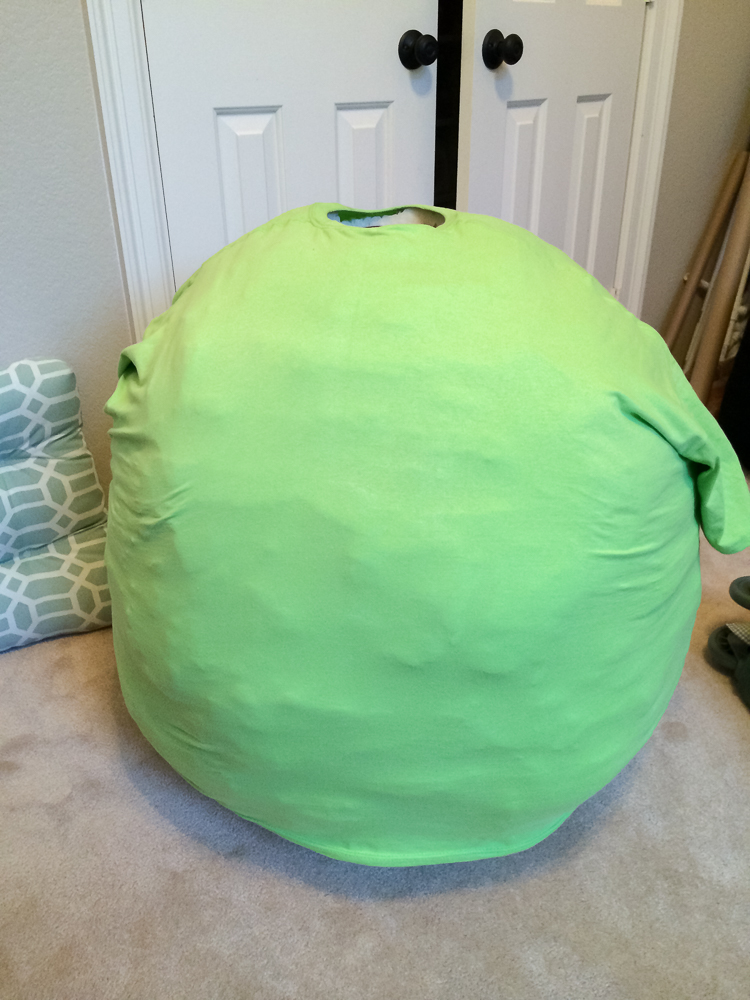
6. The next step was to figure out how to turn this guy lime green. I actually bought a few cans of lime green spray paint that I ended up returning because Grant had an even better idea: just cover it with a tshirt! I took the measurements of the ball and then used those measurements to look online and compare it to a men’s sizing chart. Turns out my costume was about the size of a men’s 6XL, so I got to work looking for a tshirt that would fit! This is where I just love Amazon. In a matter of minutes I found this result on Amazon and ordered two t-shirts in lime green (at the time they were each less than $10). I’m glad that I ordered two because even with all the stretching we did, one tshirt was too short. It fit over the bulk of my costume just fine, but I would have had to cut it much higher in order for the green tshirt to cover it completely on the bottom. It was important to me that the costume be as big as possible, so we just put one tshirt on from the bottom up, and one on from the top down. They overlapped at the bottom (which you can see in the final picture) but I think it looked fine! And I was happier with that than the alternative of having a shorter costume.
7. After fitting the tshrt on, we unplugged the beach ball and deflated it, pulling it out from the bottom. We were worried about this step but the beach ball detached itself really easily and no damage was done! Plus now we have an 8-foot beach ball to play with in the pool next summer :) We then used the tshirt head and arm holes as a guide and cut into the foam with an exacto knife in order to give me room for my head and arms. We didn’t have to cut anything off the bottom, since we planned that out ahead of time and when foaming, we left space on purpose at the bottom so I could slip the costume over me.
(You can see in the picture above how the costume looked after the ball was taken out and the tshirt went on. I was deciding whether I wanted to tuck the sleeve into the hole (left) or leave it out (right). I decided to leave it out, that way it would cover my arms too.)
8. Now the next step was making the eye! I went to JoAnns and found this styrofoam half-ball that I thought would work perfectly. I simply used black and blue paint that I had on hand to paint in the eye and then let it dry.
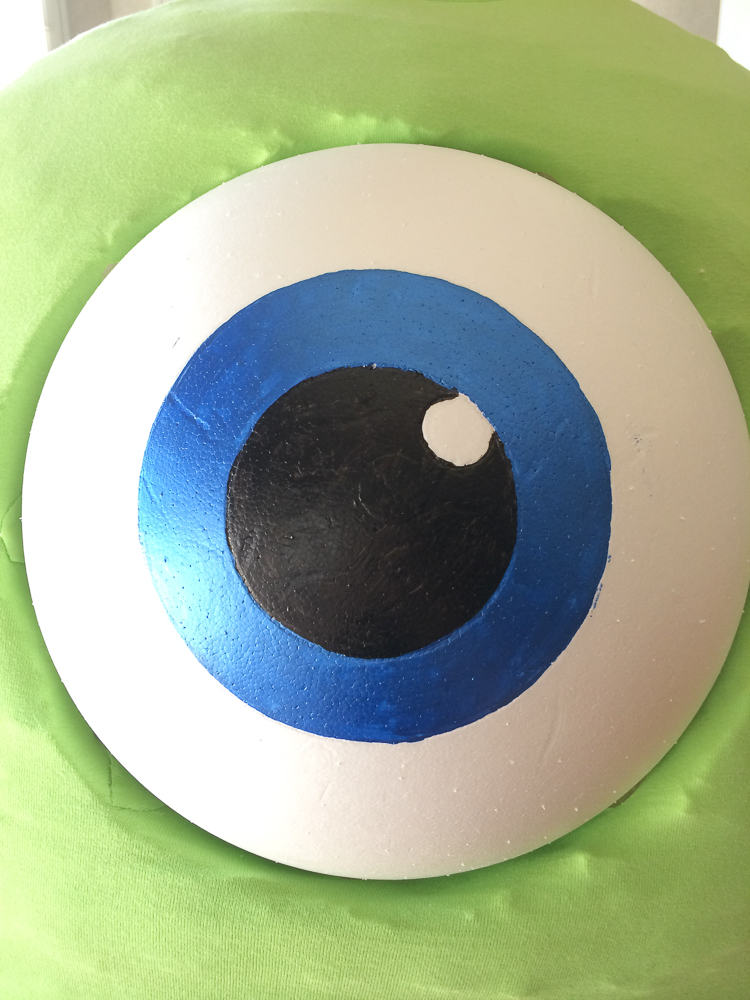
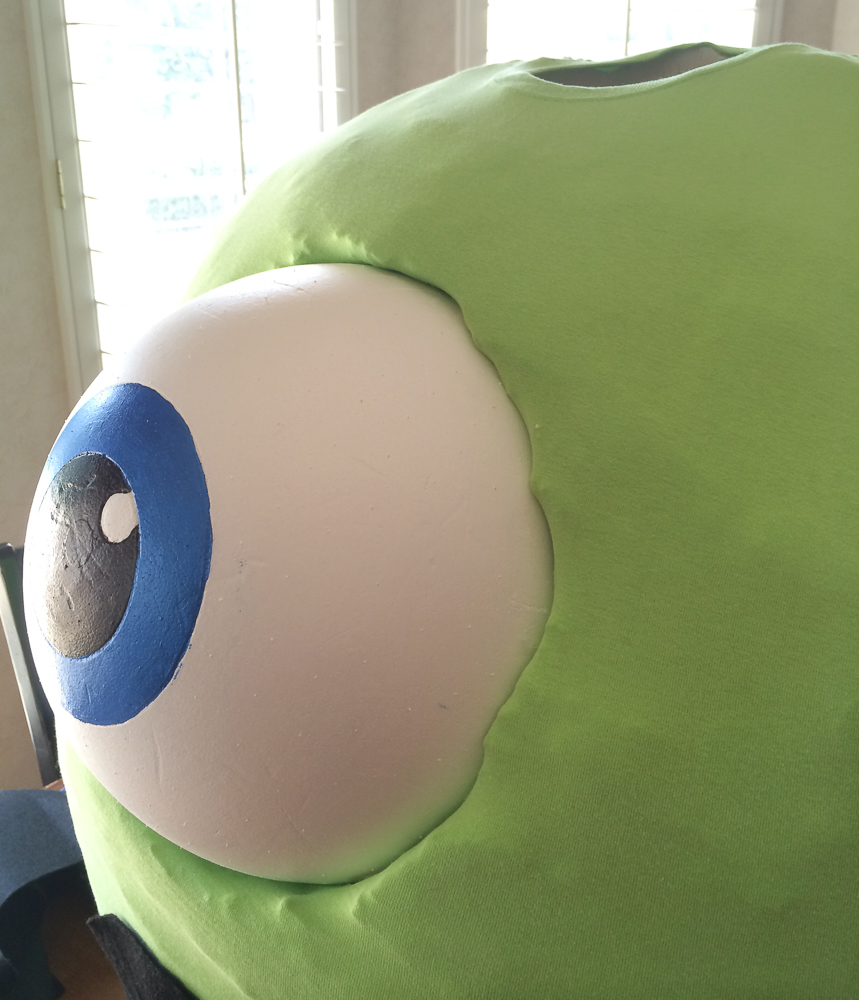
9. Next was fitting it into the costume. This was a little trickier since we had to cut the hole for the eye on the inside of the costume. So we worked together and kind of guessed where we wanted the eye positioned, and then Grant cut out a slightly smaller circle from the costume, so we could stuff the eye in and it would hold by being wedged in, instead of glued. Before wedging the eye in completely though, I stretched the tshirt (which had been cut too) and pulled it from the outside in and hot glued it around the cut-out hole. This way I wouldn’t have the original foam showing through. I hope that makes sense! It was very simple to do and once it was all dry, we were able to stuff the eyeball in from the inside out. It looked great!
10. Now for the mouth! This was also an easy step. I grabbed black and white felt that I had on hand, cut out the shapes I wanted to use for the mouth and teeth, and then sewed them together.
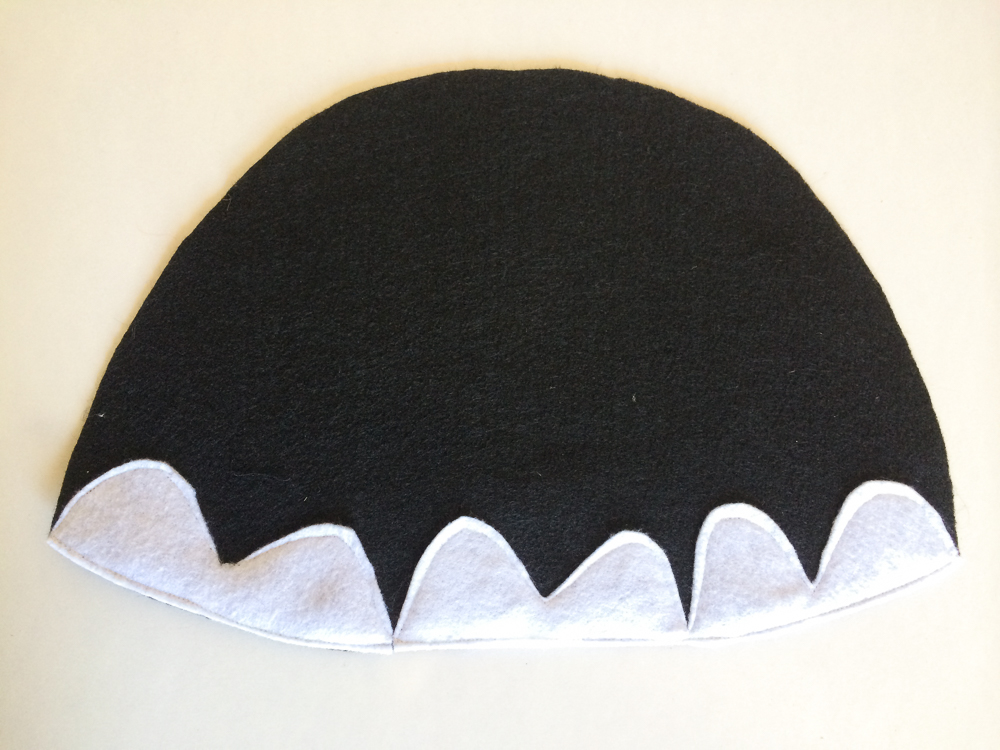
11. Once I had the mouth completed, all I had to do was sew it onto the costume. Instead of taking the tshirt off and sewing it with my machine (this wasn’t an option since I had already cut the hole for the eye and we had secured that to the costume), I just lifted the bottom of the tshirt up a little bit and hand sewed the mouth on. It really didn’t take long and since the mouth is so light-weight, I wasn’t worried about securing it on too well. Just a few stitches around the whole mouth did the trick!
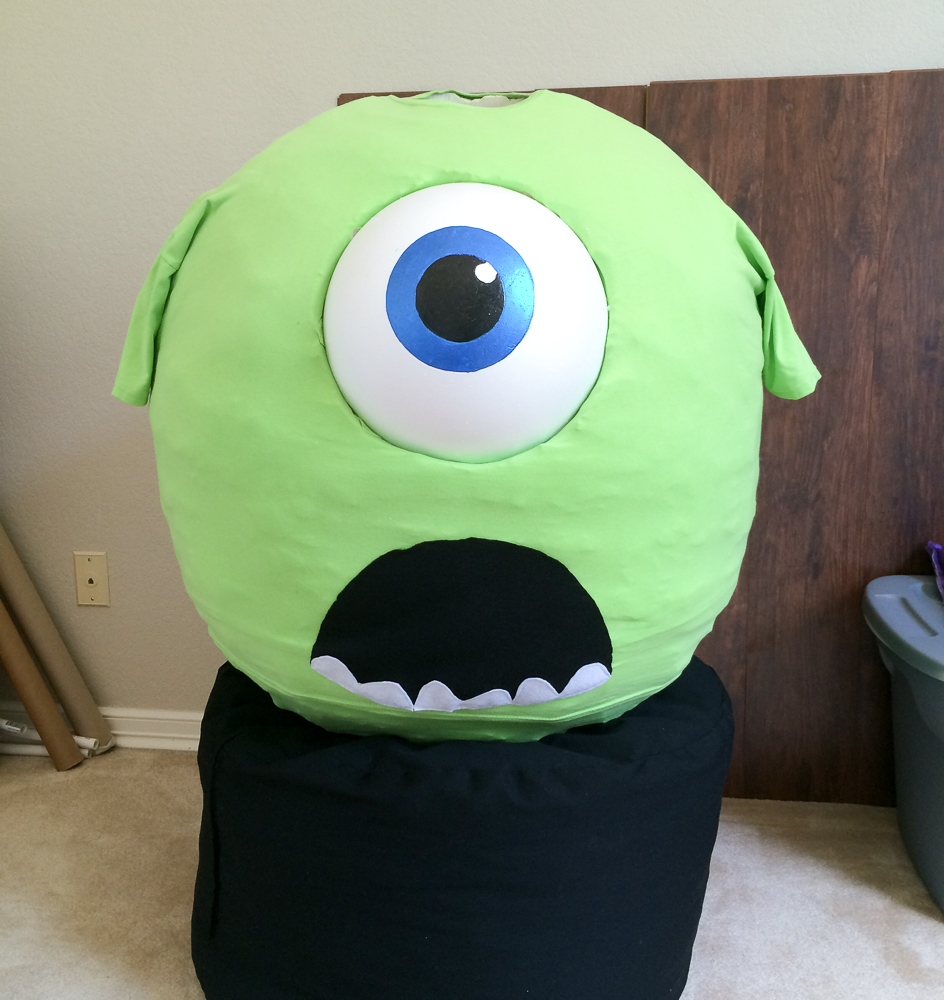
12. The last step to finish the body of the costume was to make the horns. This too was very easy as all I did was buy two of these styrofoam cones from JoAnns and then hot glued them on to the shoulder of the tshirt!
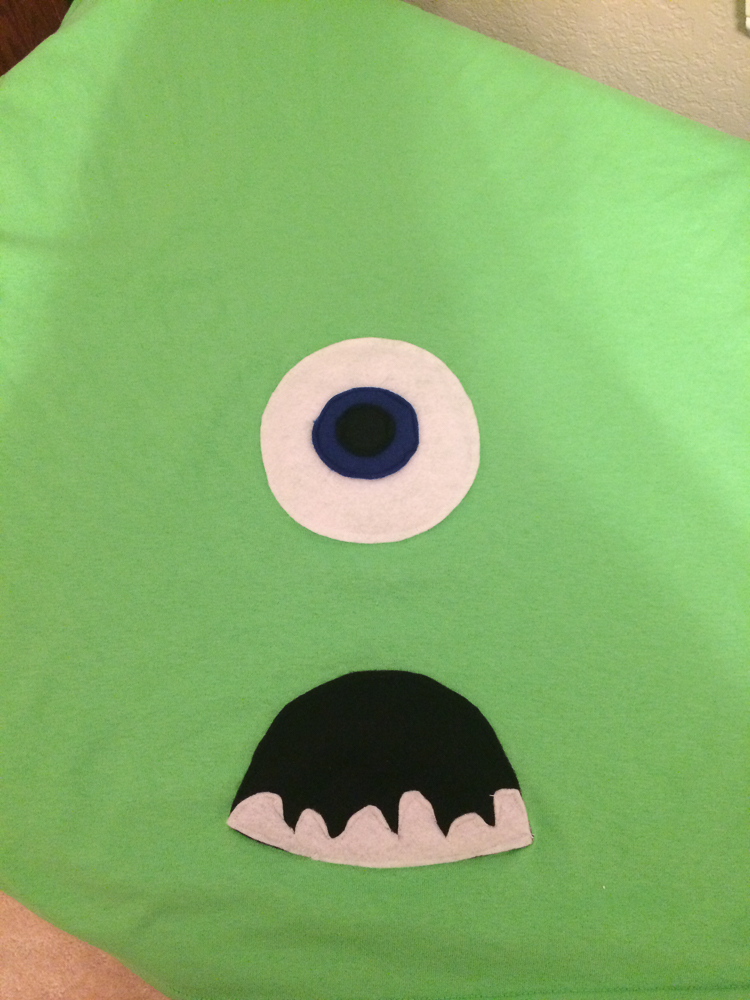
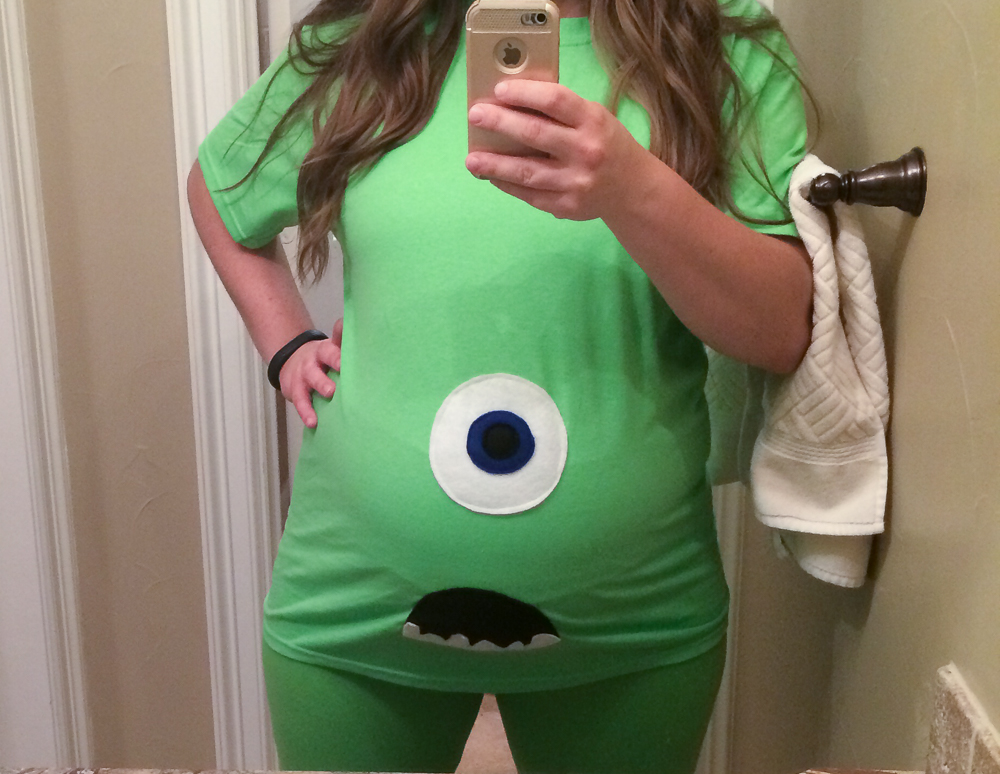
13. And finally, the last step to complete my costume was to find green pants and a tshirt to wear underneath. I was worried about finding lime green pants, but after looking through Amazon I just googled it and found these. They worked perfectly! The tshirt was also easy to find—I could have bought one off Amazon, at Walmart, Target, etc. But I happened to be at Hobby Lobby one day and grabbed a lime green shirt they had. I then returned to my stash of felt and cut out shapes for an eye and a mouth to match my giant costume. I knew I wanted to make a mini version for the tshirt I’d be wearing underneath. That way, even when I had to take my costume off (like to eat), I would still be Mike Wazowski with my pregnant belly! I sewed the shapes together and then sewed them onto the shirt. Very easy! And so comfortable too—I was basically just wearing pajamas all night :)
So there you have it! It might look complicated, but each step was fairly simple. It just took a lot of time! I knew it was going to, though, which is why I got started in August! Grant thought I was crazy, but it was nice not having to worry about finishing costumes right before the party. Starting early also ensured we were able to wait on certain things to come in, like the tshirts from Amazon, and figure out the best way to complete each step. Plus I was able to take my time on it, instead of having to work on it all at once. I’m really happy with how it turned out—I think we all looked great together!
Next I’ll do a tutorial post for Emery’s Boo costume! So look out for that, if you’re interested :)
Pingback: The Manions | Monsters Inc. “Boo” Costume DIY
Great costumes and tutorial! I think I will have to make these for Halloween next year!!
This is amazing! Were the 5-6 cans of foam spray enough to cover the entire thing or did you have to get more?
They were just enough! I’d always rather buy too much and just keep the receipt to return whatever I didn’t use. But 5-6 should be enough!